Showing posts with label gluten free. Show all posts

Thursday, May 30, 2013

Gluten Free Banana Bread + How to Make Homemade Oat Flour

Pin It Now!

This blog has moved!!  Please join us over at Sealed With a Whisk!

Long post alert!  We have had quite the exciting dramatic eventful week over here, folks.  Memorial Day weekend brought the unofficial official kickoff to Santa Barbara's fire season - complete with a brand new fire, dubbed the "White Fire":


Around 2:30 Monday afternoon I thought I smelled smoke.  Hubby had said that the neighbors were getting ready to BBQ, so I thought maybe they had tossed some wood into their pit.  A bit later as Chico and I were in the backyard, I noticed the telltale red tinge when I looked around... then looked up and saw a thick, heavy blanket of smoke in the sky.  These images were taken from La Cumbre peak using my iPhone. 


Firefighters here in Santa Barbara work so hard during fire season.  This area is notorious for its many wildfires, and the red, smoky sky is, unfortunately, an all too familiar sight to us locals.  Thankfully, this fire has stayed on the other side of the mountains. Despite strong winds and soaring temps, not a single home has burned and no one has been injured.  Fires in the past (Painted Cave, Tea FireJesusita Fire, Lightning Series Fires) have had devastating, long term effects on California and its residents.  Many of our friends have lost homes over the years, and Hubby's family came extremely close to losing their home during the Painted Cave Fire.  We are very thankful that this one has not come down into town!


Mother Nature couldn't let us get too comfortable once the fire was somewhat controlled... Wednesday as I was about to leave for work, I heard a loud *BANG* as the house lurched and started shaking to the tune of a 4.9 earthquake hitting just 3 miles off of our coast. It was so loud I thought someone/something had crashed into our house!  Dramatic little city, aren't we?  I think I've had enough excitement for one week.

So, anyway, back to the good stuff - food!

You may remember the Flaxseed Nutella Banana Bread recipe that I posted last year.  As delicious as that recipe is, it desperately needed a healthy makeover.  Lately I've been really paying attention to how I feel after I eat certain things; I feel my best when I keep to lean proteins such as fish and chicken.  Sugar gives me an awful headache and a jittery feeling in my gut, so I've been trying my hardest to keep it out of my diet. I allow myself to indulge in moderation, which keeps my sweet tooth satisfied without making me feel like crap.   Win!


This banana bread freezes well, and isn't overly sweet.  Hubby loves it drizzled with local honey.  Feel free to toss in some golden raisins, mini chocolate chips or whatever your heart desires.  At the last minute I decided to top mine with oats mixed with a smidge of brown sugar and cinnamon.  It gives the bread the perfect tiny bit of sweetness.

Gluten Free Banana Bread
| Servings: 1 loaf | Prep: 10 mins. | Bake: 50 Mins |
1/4 c coconut oil, melted
1/2 c plain greek yogurt
1/4 c (scant) agave
1/4 c honey
1 egg
2 tsp vanilla
2 c oat flour (see below)
2 tsp baking powder
1/2 tsp baking soda
1 1/2 tsp cinnamon
1/8 tsp salt
1 c bananas, overripe, mashed
1/2 c chopped nuts
For the topping
1/4 c oats
2 tbsp brown sugar
1/4 tsp cinnamon

Preheat oven to 350 degrees.  Spray a 9x5 loaf pan lightly with non-stick spray.  Set aside. {Alternately, you could make this recipe into muffins - bake for about 15-20, or until cake tester comes out clean.)

In a small bowl, mix together the coconut oil, greek yogurt, agave, honey, egg and vanilla and bananas.  Set aside.  In a large bowl, combine flour, baking powder, baking soda, cinnamon and salt.  Stir the wet ingredients into flour mixture until thoroughly incorporated.  Gently fold in the chopped nuts and any other additions (dried fruit, choc chips, etc.) and stir until just combined. Pour bread dough into the prepared loaf pan.

In a small bowl, stir together the 1/4 c oats, brown sugar and cinnamon.  Sprinkle over the top of the bread dough.  Bake bread for 45-55 mins., or until a cake tester comes out clean.  Cool completely before slicing and serving.  Or not.  It's really great still warm.


To make the oat flour...

I will not call this a "recipe" because it simply involves one ingredient and one easy step.  "Gluten Free" is everywhere and I personally know several people who are intolerant to gluten, so I wanted to make this recipe accessible to all.  If you have gluten free oats on hand, you can make this oat flour to use in your baking adventures.  Woohoo!

Gluten Free Oat Flour
Makes 2 cups
What you need:
2 cups gluten free oats*
Food processor

Pour the oats into the food processor and pulse until finely ground.  Tada!  Oat flour!

*Not all oats are gluten free.  Trader Joe's carries a large bag of GF oats for $3.99.


This blog has moved!!  Please join us over at Sealed With a Whisk!
Photobucket

Tuesday, April 30, 2013

Back from hibernation... {Veggie & Quinoa Stuffed Bell Peppers}

Pin It Now!
You all must think I've either: a) forgotten about you or b) have been swept away to some hidden tropical paradise where there is no internet and an endless supply of pina coladas delivered to my hammock on the beach.  Well, rest assured I haven't forgotten about you.  And, alas, I have not been swept away to said tropical paradise. Sigh.

source


See.  Not lounging in that hammock.  And I'm certainly not seeing any pina coladas...

I've been doing both a whole lot of stuff, and a whole lot of nothing this year.  Some of it has been eventful, and some of it not, and I'm perfectly fine with both.  Some really yummy things have been creating in the kitchen, but for some reason my motivation to blog them has been definitely lacking, so I've been selfishly keeping it all to myself and sharing a little bit with my hubby cuz I have to.  ;)

Since you've been so patient and have put up with my awkward silence for the past four (wow, actually nearly FIVE) months, I'm back to share a delicious and simple recipe with you.  Along with a crummy instagram pic of said recipe.  You guys are so lucky.

I've taken to calling myself an "accidental vegetarian" as of late.  For some reason as soon as 2012 turned into 2013, my taste for meat all but vanished.  In fact, I've been finding red meat pretty repulsive.  I can handle seafood just fine, and the occasional bite of chicken, but that's it.  Hubby has been a great sport and even found that veggie burgers are pretty darn delicious.

Here is the recipe for our Veggie & Quinoa Stuffed Peppers that we had for dinner the other night.  They may not look like much, but these babies were tasty, and make great leftovers. Leave out the cheese to make this vegan. We had a simple side salad with a balsamic drizzle that  I will be sharing in a future post.


Veggie & Quinoa Stuffed Peppers
4 bell peppers, any color(s), tops and seeds removed
1/3 c chopped sweet onion (about half of a small onion)
1 small garlic clove, minced
1 1/2 c cooked quinoa
2 zucchini, diced
1 c fresh corn kernels (frozen is fine)
1/4 c cilantro, finely chopped
1/4 crumbled feta
1/2 c chopped asparagus
juice of 1/2 lime
Few pinches of mozzarella

Preheat oven to 350.  Line a small baking sheet with parchment and set aside.

In a large bowl, combine quinoa, diced zucchini, corn, cilantro, feta, asparagus and the lime juice.  Salt and pepper to taste.  Set aside.  In a small pan, heat 2 tsp olive oil and add chopped onions.  Saute until onions are beginning to soften, about 5 mins.  Add minced garlic and cook another 1-2 mins.  Add to the quinoa and veggies and stir to combine.  Spoon the mixture into each pepper and top with a pinch of mozzarella , if desired.  Bake approx. 20 minutes, until peppers are beginning to soften.
Photobucket

Friday, July 27, 2012

Homemade granola {gluten free}

Pin It Now!

This blog has moved!!  Please join us over at Sealed With a Whisk!

Granola is one of my favorite foods.  I love granola with fresh fruit and some greek yogurt, and Hubby likes to top his smoothies with granola for a crunchy post-workout snack.  We've been buying tons of granola and the other day I realized that we could - and should - be making this at home.


Store bought granola can be loaded with oils, flavorings and preservatives, all of which I'd rather not indulge in.  Anything made at home gives you the ability to control what goes into your food.  In the case of this granola I used healthy coconut oil instead of vegetable or canola oil.

Coconut oil is something I'm only beginning to experiment with.  It is pretty easily found in most grocery stores - I get it at Trader Joe's.  It is high in saturated fat (hold on, don't freak out yet!) however the saturated fat in coconut oil is different from other oils in that it does not increase LDL levels.  Coconut oil has been found to be useful in losing weight, and increases metabolism by reducing stress on the pancreas.  It also strengthens the immune system and promotes healthy digestion.  Coconut oil is solid at room temperature, so must be melted before being added to most recipes.


When it comes to granola, you can customize with whatever ingredients you like.  I added in ground flax seeds and raw almonds.  You could also toss in some dried fruit or shredded coconut.  I think I'll make this a fall treat next time and use some pumpkin pie spice in place of the cinnamon.  Yum!

Homemade Granola
2 c rolled oats (make sure they are gluten free if that is a concern)
1 tbsp cinnamon (scant)
Pinch of salt
1 tbsp coconut oil, melted
1/3 c honey
1/2 c raw sliced almonds
1/3 c ground flax seeds

Preheat oven to 325 degrees.

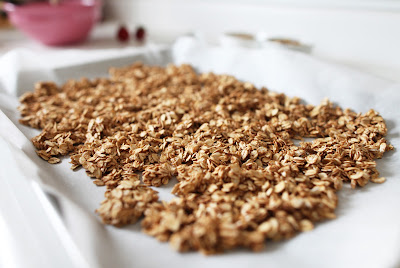
In a medium bowl, stir together oats, cinnamon and salt.  Add in coconut oil and honey, stirring until thoroughly combined.  Spread mixture on a parchment lined baking sheet.  Bake 30-45 minutes, stirring occasionally.  (If you wanted the nuts toasted, add during the last 5-10 minutes and make sure to stir frequently to prevent them from burning.)  The longer the granola cooks, the crunchier it will be.  Cool completely before adding almonds (unless toasting) and flax seed.  Store in an airtight container.


This blog has moved!!  Please join us over at Sealed With a Whisk!
Photobucket
Related Posts Plugin for WordPress, Blogger...